
Clay Pot Shark Craft For Kids
Looking for a fun shark craft for Shark Week? Today, we’re excited to share how you can create the cutest clay pot sharks using simple materials from your local dollar store.
This easy and engaging activity is perfect for parents and primary children, offering a wonderful opportunity for bonding while crafting something truly jawsome together!
Do you have a young shark enthusiast in your life? The kids at the library were captivated by sharks and couldn’t get enough of Shark Week.
There is something undeniably awe-inspiring, terrifying, and yet fascinating about these magnificent animals!
Shark fans of all ages will love our cute shark craft. Let’s dive into the world of these fascinating creatures and create some fin-tastic memories together!

As an added bonus, this activity is also a great educational opportunity.
It fosters the development of fine motor skills in children as they cut, glue, and color their way to creating an incredible shark-themed masterpiece.
Your children will surely enjoy this interactive craft and learn new skills.
This post is part of my growing collection of easy arts and crafts for kids. Easy projects your kids will love to try. Need more inspiration to keep kids busy? Our Indoor Activities page is packed with fun ideas.
Materials Needed To Make Our Shark Craft
- Free Shark Pattern Printable
- Small Clay Pots (3.5” and 2.5“)
- Craft Foam (White, Blue)
- Google Eyes
- Glue Gun and Glue Sticks
- Acrylic Craft Paint (Red, Light & Medium Blue)
- Paintbrush
- Scissors
- Pencil
- Black Permanent Marker
How To Make To Make Our Shark Craft
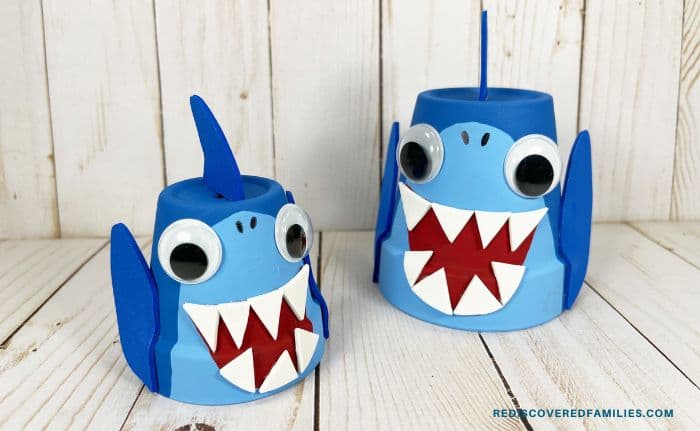
Begin by gathering all your supplies. Remove any paper tags from the clay pots and print out the Clay Pot Shark Patterns.
Carefully trace the shark head pattern onto both clay pots. Paint the shark heads with light blue acrylic paint. Allow them to dry, and apply a second coat if needed.
Paint the rest of the clay pots with the medium blue acrylic paint. Again, let them dry completely and apply a second coat if needed.
Trace the shark mouth onto both pots. Now it’s time to add some color! Paint them with red acrylic craft paint. Let them dry thoroughly, and apply a second coat if needed.
Trace the shark teeth onto white craft foam and carefully cut them. Glue the teeth to the shark’s mouth.
Glue two wiggle eyes to each shark. Then, use a black marker to draw on some nostrils for extra character.
Lastly, trace the shark fin patterns onto blue craft foam and cut them out. Glue one fin to each side of the sharks’ bodies and attach the dorsal fins to the top using the glue gun and sticks.
Now you have yourself some cute sharks! Isn’t that simple?
Check Our Other Clay Pot Crafts
- Easy Clay Pot Turkey Craft For Kids
- Clay Pot Pumpkin Pie
- Valentine Clay Pot Love Bug
- Patriotic Clay Pot Bugs
- Terracotta Winter Bugs
Keeping The Costs Down
Feel free to use whatever crafting supplies you have on hand. The shark doesn’t have to be blue.
If you have purple and grey paint on hand, use that. If you have scraps of craft foam in different colors, use those.
The main thing is to have fun with it. You could make a shiver (a group) of sharks in all different colors.
Clay Pot Shark Craft For Kids
Equipment
- Paintbrush
- scissors
- 1 pencil
Materials
- Shark Pattern
- Small Clay Pots 3.5″ and 2.5″
- Craft Foam White, Blue
- Google Eyes
- Glue Gun and Glue Sticks
- Acrylic Craft Paint Red, Light & Medium Blue
- 1 permanent black marker
Instructions
- Begin by gathering all your supplies. Remove any paper tags from the clay pots and print out the Clay Pot Shark Patterns.
- Carefully trace the shark head pattern onto both clay pots. Paint the shark heads with light blue acrylic paint. Allow them to dry, and apply a second coat if needed.
- Paint the rest of the clay pots with the medium blue acrylic paint. Again, let them dry completely and apply a second coat if needed.
- Trace the shark mouth onto both pots. Now it’s time to add some color! Paint them with red acrylic craft paint. Let them dry thoroughly, and apply a second coat if needed.
- Trace the shark teeth onto white craft foam and carefully cut them. Glue the teeth to the shark’s mouth as shown.
- Glue two wiggle eyes to each shark. Then, use a black marker to draw on some nostrils for extra character.
- Lastly, trace the shark fin patterns onto blue craft foam and cut them out. Glue one fin to each side of the sharks’ bodies and attach the dorsal fins to the top using the glue gun and sticks.
Notes
The cost is an estimate and will vary depending on your location.
Looking for more fun ideas to keep kids entertained? Head over to our Kids Activities page where you’ll find hundreds of fun ideas all in one place.