
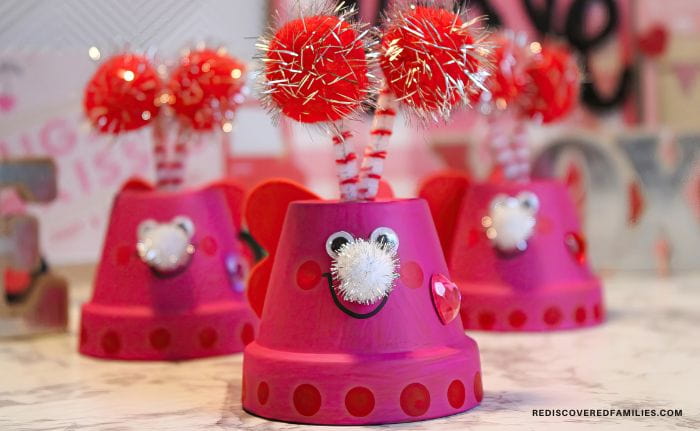
Clay Pot Love Bugs For Valentine’s Day
Ready to spread some love this Valentine’s Day without breaking the bank? I’ve got the perfect craft for you to make with your kids– Clay Pot Love Bugs!
No need for fancy supplies; just grab some materials from Dollar Tree and your craft stash. Your kids will love these.
Get ready for some family fun with this adorable craft! Most kids love making things, and crafting is a fantastic family activity.
These love bugs are the cutest decorations for Valentine’s Day, and your little ones will absolutely adore making them.
So, grab the supplies, gather the family, and create these lovable Valentine’s decorations!
Materials Needed

- Pencil with new Eraser
- 5 inch Clay Pots
- Heart-shaped rhinestones
- Small red tinsel Pom Poms
- Small white pom pom
- Large red foam hearts
- Acrylic Craft Paint: Pink and red
- Google eyes
- Black Permanent Marker
- Red Chenille Stems
- Glue Gun and Glue Sticks
- Paintbrush
- Scissors
Instructions For Making Clay Pot Love Bugs
Step One: Preparing the Body
Start by giving your clay pots a clean canvas by removing tags or stickers. Once that’s done, grab your pink acrylic paint and brush on a base coat.
Let it dry, and then add another layer for that perfect pop of color. You can move on to the next step while waiting for the paint to dry.
Step Two: Preparing The Antenna
Let’s give our love bugs some charming antennas! Grab a chenille stem and cut it into four-inch sections.
Bend each section in half to create that classic antenna shape. Use the glue gun to attach a red pompom to each end of the bent chenille stem.
Once your antennas are all set, place them to the side – we’ll add these delightful touches to our love bugs later!
Step Three: Add The Wings
Now that your paint is dry, it’s time to add some charming details! Accent the base of your love bug by creating contrasting red polka dots. Simply dip a new pencil eraser into red paint and dab it onto the pot.
Next up, let’s give our love bug wings! Cut off the bottom of two foam hearts to form wing shapes.
Use hot glue to attach these adorable wings to the center of the clay pot. Your love bug is starting to take shape – it’s getting cuter by the minute!
Step Four: Making The Face
It’s time to give our love bug a personality by adding a face! First, place the antennae in the drain hole at the top of the pot and secure them with hot glue.
Then, attach two wiggle googly eyes to the pot.
Finally, bring rosy charm to our bug’s cheeks – mix a dab of red paint with some pink. Dip a new pencil eraser into this delightful mixture and gently dot it on either side of the face. There you go – your love bug now has a face as sweet as its spirit!
Step Five Finishing Touches
Complete your adorable love bug by following these final steps.
Attach rhinestone hearts to your love bug for some extra sparkle. Then, grab a permanent black marker and draw a delightful smile from cheek to cheek.
Last but not least, add a white pompom nose to each face. Your Clay Pot Love Bug is now ready to spread joy and love!
Aren’t they just adorable?
Our love bugs are one of the cutest Valentine’s crafts I have ever had. They are perfect decorations for Valentine’s and make a great party activity.
They would make adorable gifts for friends or family. You can even hide some candy under it for your kid to find on Valentine’s morning. It’s a sweet way to spread love in your home during this special time of year.
This post is part of my Valentine Activities collection. You can find all my Holiday & Seasonal Activities here, or head to the Kids Activities resource hub where you’ll find hundreds of fun ideas all in one place.
More Clay Pot Crafts
This post is one of our simple clay pot crafts. Here’s a few more
- Easy Clay Pot Turkey Craft For Kids
- Clay Pot Pumpkin Pie
- Clay Pot Shark
- Patriotic Clay Pot Bugs
- Terracotta Winter Bugs
Creating these Clay Pot Love Bugs is a delightful and heartwarming activity for you and your kids. Why not gather the supplies and dive into this fun crafting adventure together? Whether for a Valentine’s party, as a gift, or just to add a touch of sweetness to your home decor. These love bugs are sure to bring joy. Pin this post if you would like to save the project for later.
Clay Pot Love Bugs
Equipment
- Black Permanent Marker
- Pencil with new Eraser
- Glue Gun and Glue Sticks
- Paintbrush
- scissors
Materials
- 2.5 inch Clay Pots
- Heart-shaped rhinestones
- Small red tinsel Pom Poms
- Small white pom pom
- Red Chenille Stems
- Large red foam hearts
- Acrylic Craft Paint: Pink and red
- Google eyes
Instructions
- Start by giving your clay pots a clean canvas by removing tags or stickers. Once that’s done, grab your pink acrylic paint and brush on a base coat. Let it dry, and then add another layer.
- Let’s give our love bugs some charming antennas! Grab a chenille stem and cut it into four-inch sections. Bend each section in half and use the glue gun to attach a red pompom to each end of the bent chenille stem.
- Accent the base of your love bug by creating contrasting red polka dots. Simply dip a new pencil eraser into red paint and dab it onto the pot.
- Next up, let’s give our love bug wings! Cut off the bottom of two foam hearts to form wing shapes. Use hot glue to attach the wings to the center of the clay pot.
- Grab your hot glue gun and attach two wiggle googly eyes to the pot. Let’s bring rosy charm to our bug’s cheeks – mix a dab of red paint with some pink. Dip a new pencil eraser into the mixture and gently dot it on either side of the face.
- Place the antennae in the drain hole at the top of the pot and secure them with hot glue.
- Next, attach rhinestone hearts to your love bug for some extra sparkle. Then, grab a permanent black marker and draw a delightful smile from cheek to cheek.
- Last but not least, add a white pompom nose to each face. Your Clay Pot Love Bug is now ready to spread joy and love!