
Simple Fall Wreath Craft For Kids To Make
Looking for a quick and easy Fall craft to enjoy with your kids this year?
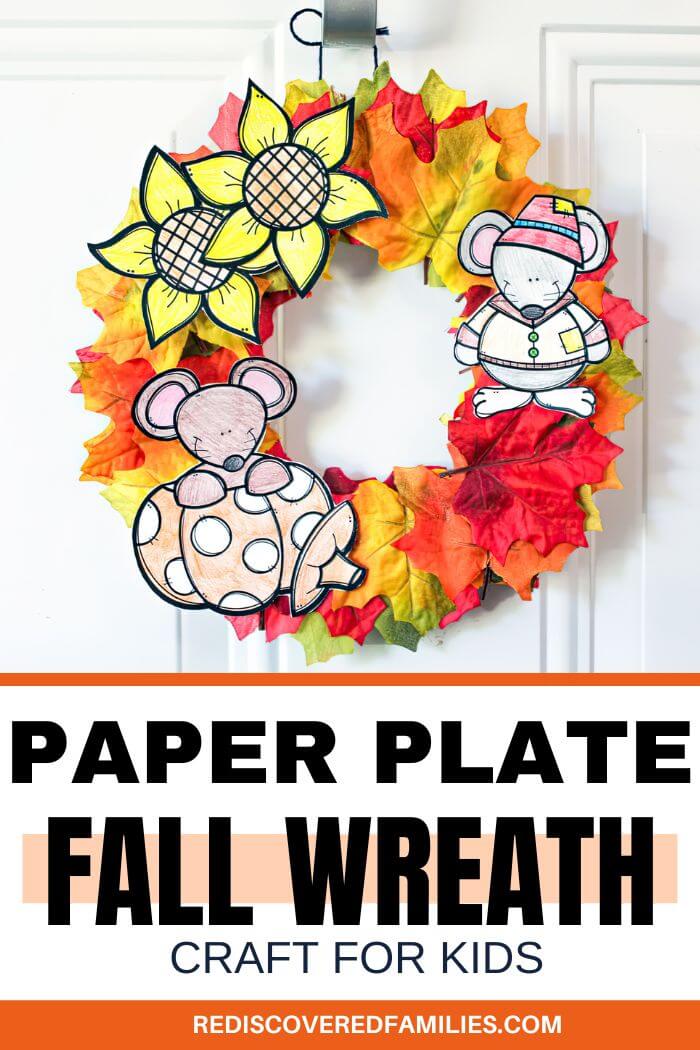
Our paper plate fall wreath for kids is the perfect activity! We’ve put together such a cute printable to help decorate the wreath.
With just a few added supplies, you can transform an ordinary paper plate into a beautiful autumn decoration that will brighten your home.
One of our favorite Fall activities was making special decorations for the house. Homemade decor adds a special touch to a home, doesn’t it? These unique treasures are made with love, and most kids love making them.
The challenge is finding simple crafts for kids that they can do independently, especially if they don’t require a lot of preparation.
I always appreciated projects that didn’t require too much preparation. Fall is a busy time with back-to-school activities and extracurricular commitments starting up.
The last thing we need to add to the mix is a complicated craft project.

A Simple Fall Wreath Craft For Kids
With that in mind, I created a simple paper plate fall wreath for your kids to make.
The craft comes with a free printable featuring adorable mice and sunflowers that can be used to decorate the wreath.
These paper plate fall wreaths are really easy to make. Younger children can make them with little help, while older kids will enjoy customizing them and adding extra decorations.
And once they’re finished, your kids will have a one-of-a-kind wreath they can proudly display.
So go ahead and print out a few copies. Why not make some to give to friends and family for Thanksgiving?
How To Make The Fall Wreath Craft For Kids
Materials
- Fall Wreath Craft Printable
- Sturdy paper plate
- Paper leaves
- Scissors
- Hot Glue Gun and glue sticks
- Yarn
- Hole punch
- Optional ribbon
Note: We found hot glue worked better on the leaves, but you can use white glue if you prefer. It will take longer to dry, and you may have to hold the leaves and decorations in place to ensure they stay in place.
What Will You Get In The Free Printable?
You will receive two pages. The first features black-and-white images that can be colored, and the second page has pre-colored images for anyone in a hurry. Aren’t they cute?
Instructions
Prepare the Paper Plate
Start by cutting out the center of a paper plate, leaving about a 2-inch rim. This rim will be the base of your wreath.
Attach the Leaves
Begin gluing the paper leaves onto the paper plate ring. Layer the leaves, covering the paper plate entirely so none of it shows through. This gives the wreath a full, lush appearance. Feel free to mix and match colors for a vibrant look!
Color the Printables
If you’re using the black-and-white printables, let your kids color in the mice and sunflowers using markers, crayons, or colored pencils. If you’re pressed for time, you can use the pre-colored printables and skip the coloring.
Cut Out the Decorations
Carefully cut out the colored mice and flowers. Older kids can do this step independently, while younger ones might need help with the scissors.
Decorate the Wreath
Once your decorations are ready, glue them onto the wreath over the leaves. Place the mice and flowers in a balanced and visually appealing way. Encourage your kids to arrange them however they like for a personalized touch.
Punch the Holes
Use a hole punch to make holes at the top of the paper plate wreath, just behind the leaves, so the hole doesn’t show.
Attach the Yarn
Cut a piece of yarn or string to the desired length, depending on how low your wreath will hang. Thread the yarn through the holes and tie a secure knot to create a loop for hanging.
Add a Decorative Bow
If you’d like to add flair, glue a decorative bow to your wreath. This step is optional but can give your wreath a charming finishing touch.
And there you have it! A beautiful paper plate fall wreath perfect for fall decorating would also be a great project for Thanksgiving.
This quick and easy craft is a wonderful way to celebrate the season and create lasting memories with your kids. Enjoy hanging your wreath and sharing the joy of your homemade decorations with friends and family!
If you enjoy making our Fall wreath, you may also enjoy putting together our newspaper flower wreath.
Helpful Tips For Making Your Fall Wreath Craft
Add Natural Elements: Incorporate acorns, pinecones, or other seeds to give your wreath a more authentic fall look. Simply hot glue them onto the paper plate ring alongside the leaves.
Cut Your Own Leaves: If you don’t have pre-made paper leaves, make your own! Use construction paper in various fall colors, such as red, orange, yellow, and brown.
Draw leaf shapes on the paper and cut them out. This can be a fun activity for kids, allowing them to create different shapes and sizes of leaves.
Layer the Leaves: When gluing the leaves onto the paper plate, layer them in different directions to create a fuller, more dynamic look. Overlapping the leaves slightly will cover gaps and give the wreath a more natural appearance.
Use a Sturdy Base: Ensure the paper plate base is sturdy enough to hold all the decorations. It is worth buying a more expensive brand. You could also cut out a wreath base from a cardboard box.
So, are you ready to try this fun Fall wreath craft for kids?! All you need is a printer, a few supplies, and creativity!
We hope you enjoy making fall decorations as much as we enjoyed preparing this project for you. It is an easy family activity and a great classroom project or group activity. Why not download the printable today?
Not ready to make this wreath just yet? Why not pin this post for later? Then you can find it quickly when you need it.
This post is part of my Seasonal Activities collection. You can find all my Holiday & Seasonal Activities here, or head to the Kids Activities resource hub where you’ll find hundreds of fun ideas all in one place.
Simple Fall Wreath Craft For Kids
Equipment
- Hot Glue gun
- Hole punch
- scissors
Materials
- Sturdy Paper plate
- Fall Printable
- Paper leaves
- Yarn
- Ribbon optional
Instructions
- Start by cutting out the center of a paper plate, leaving about a 2-inch rim. This rim will be the base of your wreath.
- Begin gluing the paper leaves onto the paper plate ring. Layer the leaves, covering the paper plate entirely so none of it shows through.
- Color in the mice and flowers you wish to use. If you are short on time, use the pre-colored images.
- Carefully cut out the colored mice and flowers and glue them onto the wreath over the leaves.
- Use a hole punch to make holes at the top of the paper plate wreath, just behind the leaves, so the hole doesn’t show.
- Cut a piece of yarn or string to the desired length, depending on how low your wreath will hang. Thread the yarn through the holes and tie a secure knot to create a loop for hanging.
- Add a decorative bow if you wish.
Notes
- To give your wreath a more authentic fall look, incorporate acorns, pinecones, or other seeds. Simply hot glue them onto the paper plate ring alongside the leaves.
- If you don’t have pre-made paper leaves, make your own! Use construction paper in various fall colors, such as red, orange, yellow, and brown. Draw leaf shapes on the paper and cut them out.
- Layer the leaves in different directions to create a fuller, more dynamic look when gluing them onto the paper plate. Overlapping the leaves slightly will cover gaps and give the wreath a more natural appearance.