
Cupcake Liner Butterflies: Fun DIY Project for Children
As the days grow longer and warmer, there’s no better time to bring a touch of nature indoors with these adorable cupcake liner butterflies.
Kids will be captivated by the simplicity and beauty of creating their own fluttery friends. They’ll add a cheerful touch to any room and encourage kids to get creative.
Kids love butterflies, so making them with cupcake liners and simple craft materials is a great activity. Of course, it is a wonderful spring or summer craft, but it can be done anytime.
This is also a perfect craft for all ages. Younger kids can easily make their own butterflies, and older ones will enjoy personalizing them with extra cute touches.
This post is part of my growing collection of easy arts and crafts for kids. Easy projects your kids will love to try. Need more inspiration to keep kids busy? Our Indoor Activities page is packed with fun ideas.

Supplies Needed
- Colorful cupcake liners (2 cupcake liners per butterfly)
- Mini pipe cleaners (or regular pipe cleaners cut in half)
- Scissors if cutting pipe cleaners
- Small embellishments and beads (Optional)
- Hot glue if using embellishments
How To Make Cupcake Liner Butterflies
Gather all your supplies in one place. The beauty of this craft is that there isn’t much needed.
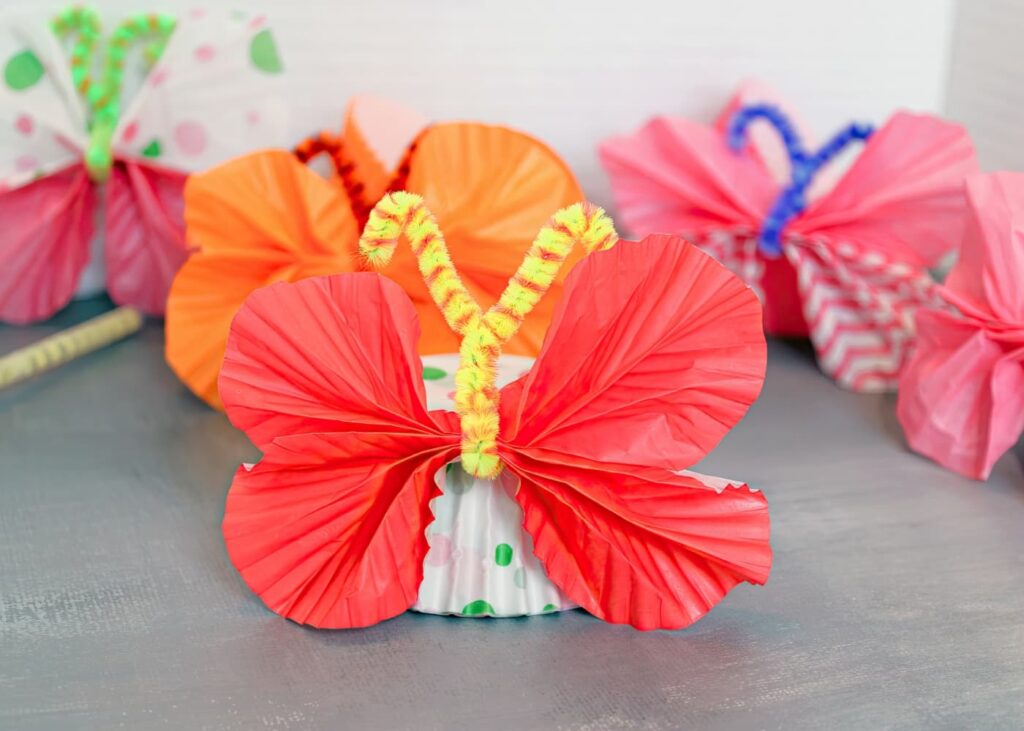
Grab a pair of cupcake liners to create the butterfly’s wings. You can use matching ones or mix them up with different colors. Lay the cupcake liners flat on your crafting surface. Smooth them gently so they’re ready to transform into beautiful butterfly wings.
Now, let’s add some magic! Accordion-fold each of the flattened cupcake liners. Start by folding up ½ inch from the bottom edge of the cupcake liner. This initial fold sets the size for the subsequent folds.
Flip the cupcake liner over, then fold up another ½ inch. Ensure the edges of the second fold align neatly with the first fold.
Repeat the process by flipping the cupcake liner and folding it again until you’ve accordion-folded the entire cupcake liner.
Don’t worry if the last fold is smaller than the others. Just continue folding until you reach the end.
When both cupcake liners are neatly folded, stack them one on top of the other.
You’ll need a pipe cleaner to hold the wings together and create the butterfly’s antennae. Simply fold the pipe cleaner in half and twist it around the center of the two cupcake liners. This will secure them together and create the butterfly’s body.
It’s time for your butterfly to spread its wings! Carefully spread out the accordion folds to give your butterfly its graceful shape. Then, curl the pipe cleaners’ ends to make adorable antennas. How cute is that?
Don’t stop there! Repeat these steps with more cupcake liners and pipe cleaners until you have a whole flutter of colorful butterflies ready to brighten your day!
Adding Some Sparkle To Your Cupcake Liner Butterflies
Our cupcake liner butterfly looks lovely, but older kids might like adding some sparkle. Try gluing a button, a foam shape, or a plastic gem at the center of the butterfly for a nice accent. You could also add some small beads to the end of the antenna.
Now, step back and admire your fluttery creations. Aren’t they simply delightful? These cupcake liner butterflies are ready to spread their wings and bring smiles to everyone!
Using Your Cupcake Liner Butterflies
Now comes the fun part. Here are some creative ways you can use the cupcake liner butterflies:
- Decorate a bulletin board.
- Attach them to string and create a butterfly garland across a window or doorway.
- Use them as table decorations for Easter.
- Glue tiny magnets on the back and display them on the refrigerator.
- Stick them onto greeting cards or gifts for a charming embellishment.
- Create a mobile by hanging them from a hoop or frame.
- Add them to a spring wreath.
This adorable cupcake liner butterfly craft is a fun and engaging activity that kids will love. The bright and colorful butterflies will be a fun and easy project any time of year.
Crafting with kids is not just about making pretty things—it’s about creating memories, fostering creativity, and sharing special moments.
Children will love making these butterflies and showcasing their creations. So, gather up some cupcake liners and let the crafting begin.
Looking for more fun ideas to keep kids entertained? Head over to our Kids Activities page where you’ll find hundreds of fun ideas all in one place.
Easy Cupcake Liner Butterfly Craft
Equipment
- Hot glue if using embellishments
- scissors
Materials
- Colorful cupcake liners
- Mini pipe cleaners
- Small embellishments and beads Optional
Instructions
- Flatten two cupcake liners for each butterfly.
- Accordion-fold each of the flattened cupcake liners and stack them one on top of the other.
- Fold the pipe cleaner in half and twist it around the center of the two cupcake liners.
- Carefully spread out the accordion folds. Then curl the pipe cleaner ends to make adorable antennas. Cut the pipe cleaners if they are too long.
- If you wish, you can glue a small embelishemnt at the center of the butterfly for a nice accent. You could also add some small beads to the end of the antenna.