
Easy Clothespin Star Craft For Kids
Looking for an easy Fourth of July craft? Gather the kiddos and prepare for a fun-filled crafting afternoon.
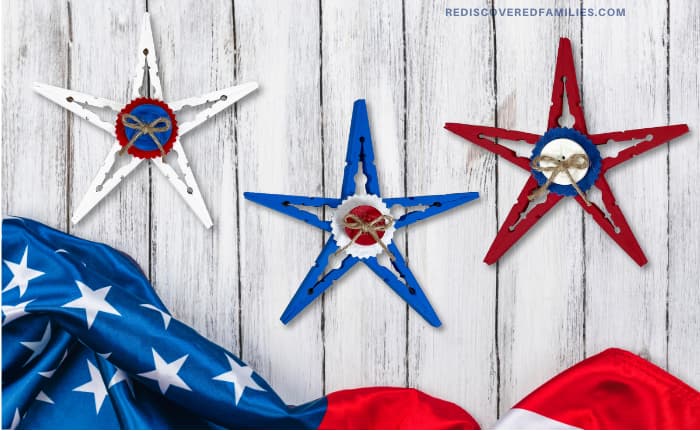
Our simple DIY clothespin star craft is cheap and easy to make. The stars in their red, white, and blue create a patriotic decoration with a touch of the American spirit.
Does your family enjoy decorating the house for special days? My boys loved creating themed decorations to celebrate all the different holidays.
It was a great way to bond, unleash our creativity, and make memories.

I wanted to create something for the Fourth of July that was easy and didn’t require many materials. So, I created these cute patriotic clothespin stars that are cheap and easy to assemble.
Kids will love putting the stars together, and you’ll like how cheap they are. You probably already have most of the supplies at home or can pick them up cheaply from the Dollar Store.
Everyone can help make these stars. It’s easy for kids to make their own, but you can also team up and make a bunch together. It’s a cool activity for tweens, especially if they want to decorate their room.
The stars can be placed all over the house, wherever you want, a burst of red, white, and blue. Use them on tiered trays, string them as garlands, or place them on a patriotic wreath.
These homemade stars are perfect for the Fourth of July. But you can also make them for other patriotic holidays like Memorial Day or Flag Day.
Materials Needed To Make Clothespin Stars
Here’s what you’ll need to make the closepin stars
- Wooden Spring-Style Clothespins
- Acrylic Craft Paint in Red, White, and Blue
- Large 1″ Buttons
- Craft Felt in our flag’s proud colors
- Natural Jute Twine for a rustic flair
- Glue Gun with Glue Sticks
- Marker, Paintbrush, and Pinking Shears
- Free printable pattern
You can use regular scissors if you don’t have pinking shears.
Follow these easy steps to create a trio of charming Clothespin Stars in 30 minutes. For a snowflake-like shape, opt for a classic 5-point or 6-point star.
This post is part of my Patriotic Activities collection. You can find all my Holiday & Seasonal Activities here, or head to the Kids Activities resource hub where you’ll find hundreds of fun ideas all in one place.
To Make Clothespin Stars
Step One: Getting The Materials Ready
First things first, collect all your supplies. You will need 5 clothespins for each star. Remove the metal springs to free up two halves from each pin.
Step Two: Glue and Construct
Now, it’s time to transform your clothespin into star points. Arrange the halves into a V shape on your workspace. Place a dot of hot glue at the tapered end of each V. These will create the points of your star!
Step Three: Assembling the Star
Now arrange the Vs into a star formation as shown in the photograph. Glue the two side points to the top point. Then, add the bottom point. Be patient and hold each joint together until the glue sets—no rush here!
Tip: If you have younger children, you may want to assemble the stars beforehand.
Step Four: Paint the Town (and the Stars)
Grab those paintbrushes! Paint each clothespin star in a different color of our flag: one red, one white, and one blue. Ensure every nook and cranny is covered in vibrant color. Allow to dry completely, and then apply a second coat.
Step Five: Embellishing The Stars
Download and print the star patterns, then trace them onto your red, white, and blue felt with a marker. Grab your pinking shears and cut inside the lines for a professional look. You can substitute paper or craft foam if you don’t have felt on hand.
Step Six: Final Touches
Use your glue gun to secure the felt circles to the center of the stars. Then, glue one button in the center of each felt circle. I ensured each star had a red, white, and blue element, but you can decorate as you wish. Tie some natural jute twine into three small bows and stick each bow to the center button of your stars with a dab of glue.
We have loads more easy crafts for you to try. You can find them all here.
I hope you and your family have fun making these Clothespin Stars! It’s a simple craft perfect for celebrating all our patriotic holidays. Don’t forget to pin this post so you can return to it for future crafting fun. Enjoy your new homemade decorations!
Get your free pattern here
Easy Clothespin Patriotic Stars
Equipment
- Glue Gun and Glue Sticks
- Marker
- Paintbrush
- Pinking Shears or Scissors
Materials
- Clothespins Wooden Spring-Style
- Acrylic Craft Paint – Red White, Blue
- Buttons 1” in diameter
- Craft Felt – Red White, Blue
- Natural Jute Twine
- Free pattern
Instructions
- Gather all supplies. Count out 5 clothespins for each star. Remove the metal springs, so that you have 10 wooden clothespin halves.
- Line up five clothespins, each in a V shape on your work surface. Glue them together at the tapered end with a glue gun. These will become the points of the star.
- Dry fit the five V shapes into a star pattern on your work surface. Use the photo as a guide, or the pattern provided. Attach the two horizontal points to the top point using a glue gun and glue sticks. Hold the points together until the glue has completely cooled. Then glue the two bottom points, holding the joints until the glue has cooled completely.
- Paint each clothespin star in a different color of our flag: one red, one white, and one blue. Let dry completely, and apply a second coat, if necessary.
- Download, print, and cut out the CLOTHESPIN STAR PATTERNS. Trace the circle pattern onto red, white, and blue craft felt with a marker. Carefully cut out the circles using pinking shears for fabric. Cut inside the traced lines for a clean, finished project.
- Use your glue gun to secure the felt circles to the center of the stars. Then, glue one button in the center of each felt circle.
- Tie some natural jute twine into three small bows and stick each bow to the center button of your stars with a dab of glue.
Notes
You can also use colored cardstock or craft foam if you do not have felt.
If you are doing this craft with younger kids, you may want to assemble the stars ahead of time