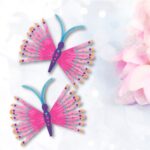
Clothespin Butterflies
Looking for a fun and creative activity to do with your kids? Try making clothespin butterflies! With just a few inexpensive supplies and a little time, you can create charming butterflies to brighten up any corner of your home.
Yield: 2 butterflies
Equipment
- Hot Glue
- scissors
- Paintbrush
Materials
- Wooden Spring Clothespins
- Acrylic Craft Paint – White 2 Shades of yellow and pink, purple and blue.
- Blue Pipe Cleaners
Instructions
- Remove the spring from 11 clothespins.
- Glue five of the clothespins together. Glue the flat sides together.
- Put aside one of the full clothespins for the butterfly's body.
- Next, line up each wing on your work surface as follows- 2 halves, 1 full, 2 halves, 1 full, 2 halves. Glue the wings together at the base.
- Carefully glue the wings to the left and right sides of the butterfly's body. Hold each wing in place until the glue sets.
- Repeat these steps to complete the second butterfly.
- Apply a base coat of white acrylic craft paint to the clothespin butterflies.
- Paint the butterfly bodies with purple paint. Allow it to dry thoroughly.
- Use the lighter shades of acrylic craft paint for the wings.
- Paint the inside sections closest to the body with a darker shade of craft paint and blend the colors to create a smooth gradient.
- Use the end of a paintbrush handle to create polka dots on the butterfly's body and wings.
- Cut a blue pipe cleaner in half. Bend each pipe cleaner to create the antennae. Glue one antenna to the top back of each butterfly.
Notes
if you don't want to use hot glue, substitute craft glue. It will work just as well but takes longer to dry.